With two appendixes.
Fitspng has been originally developed as an utility for a fast conversion of FITS images to PNG format. It is required for our Monteboo data archive for observed image display in an usual internet browser. The conversion can be also required for example for color imaging (look forward).
Some time ago, I did the conversion by two steps: to8bit utility converted normal (16-bit) FITS to 8-bit with an intensity scaling and convert (utility by Imagemagick) done FITS to PNG conversion. The way have been simple for me (I didn't have learn of libpng API) but one is slow due to high system load and storing of middle product on hard disk.
A long time (two years at least), the functionality satisfies of me, but now I have new ideas and I extended functionality of fitspng with respect on rawtran utility and some new knowledge.
Color images
If a multi-color FITS or tree normal (gray) FITSes is passed to fitspng as file to convert than 8-bit color png is created by the algorithm:
- Fits is opened and recognized as multi-color FITS. All color bands are loaded.
- The median and mean deviation of positive differences is computed on 10x10 grid (to speed-up the estimation) for every color band. The computation is abandoned when user specified the -fl switch.
- These estimated parameters are merged with an user specification by -fr switch. Also white balance is setup via CBALANCE FITS keywords of every band or by -w switch.
- Than every pixel is scaled by specified intensity profile, supplied parameters and white balance.
- The file is saved as color PNG with RGB colors (without alpha channel). (May be useful add the alpha to image?)
bash$ rawtran -t 2 IMG_666.CR2 > color.fits
bash$ fitspng color.fits > color.png
Of course, the direct way by ufraw or dcraw will be faster, but you can't apply some enhancing on images and mouse clicking may be really time consuming.
The most important application is on color composing of image data of CCD. The composition itself for tree images in R,V,B filters can be simple:
bash$ fitspng m1_R.fits,m1_V.fits,m1_B.fits > m1_color.png
The default setup of parameters will produce relative nice images but for more nicer images will be need some fine grained tuning via -fX, -w and by specifying of one from transformation functions: asinh, log (magnitude), error function, sqrt and linear transformation. The setup of various parameters by -fX is usually required when a histogram has and non-usual profile (always for non-stellar images).
If you requires nice publishable images, it is absolutely necessary to done basic processing like, dark and flat field correction and detailed photometric analysis. Ideal way is looking for A0 type (not saturated) star and balancing of the images by hand or by -w.
Note, that all single images has its own header with defined keywords which can/are be different. If any keyword is duplicated we get only the first match.
The multi-color FITS has structure:
FITS
+-----------------------------------+
| Primary array - dummy |
+-----------------------------------+
| Extended array - R image |
+-----------------------------------+
| Extended array - G image |
+-----------------------------------+
| Extended array - B image |
+-----------------------------------+
Intensity (flux) scaling
Inspired by Christian Buil, I had implemented asinh intensity profiles together with logarithmic, square root, error function and reimplemented the linear profile. Results are really nice. The profiles are presented on images. BTW, the intuitive color conversion curves which I used with ufraw are similar.
The conversion can be described as an function between output and input data. The input intensity I can be integer or real number without specified range. The output O level has integer range 0 .. 255. The I is transformed to O by
O = f0*f(x) + z0
where f0 is a scaling constant and z0 is black level. The function f(x) can be one from list:
asinh(x)
log(x)
erf(x)
sqrt(x)
x (f0 = 1)
The argument x is computed by a linear transformation
x = (I - t)/s
where t is a "mean" level and s is "mean" deviation. Values t are estimated by fitspng by median of grid pixels with separation of ten pixels (med). The s is determined by the same way on the same set but from positive deviations of t (not from absolute deviations as usually) (mad). Both parameters are corrected by constants u,v:
t = med - 3*mad
s = mad/15
The specified intensity transformation is a product of black magic on images and it can't be derived from an exact axioms. It empirically describes usual parameters of histograms of astronomical images.
The asinh magnitudes are used as photometric product of the Sloan sky survey. They recommends of use of the magnitudes in Lupton et al.(1999) and for color imaging in Lupton et al.(2004).
Working with full directory of images
Fitspng is ideal utility to done fully automatic conversion of fits images. It can be useful for fast look analysis in anyimage viewer or simple file browser. The thumbnails can be generated by command:
bash$ for A in *.fits; do fitspng -a -s 5 $A > ${A%fits}png; done
The switch -s resize the image 5 times.
How to create an animation
If we have images in png format, it is trivial to create an animated gif (with 50 milliseconds delay between images) via convert command of Imagemagic:
bash$ convert -delay 50 *.png animated_sky.gif
Larger animations is preferred to save to mpeg format. It can be created with small script:
---
#!/bin/bash
I=0
for A in *.png; do
for B in $(seq 1 25); do
I=$((I + 1))
N=$(printf "img%04d.png" $I)
ln -s $A $N
done
done
ffmpeg -f image2 -i img%04d.png animated_sky.mpg
---
The ffmepg requires 25 frames per second (at least 10 fps) so we create 25 times links on a single frame. The conversion requires relative small images with approximate size of a post stamp (about 800x600).
Notes.
I spend some time with optimizing of fitspng for speed because the conversion of normal size image gets a few seconds. Unfortunately, any hooks in main cycle are insignificant and, perhaps, the all actions consuming approximately the same part of execution time. The conclusion is that any (great) numerical operations has negligible fluency on execution duration. It is possible to visually inspect of the duration with setup of -v (verbose) switch.
I'm little bit confused about use of keywords of FITS files. They can be defined arbitrary and fitspng can produce fake outputs. I think that the most important is CBALANCE. Fortunately, the keyword can be replaced by -w switch. All others will only put wrong of description of image included in PNG file. The used keywords are listed in source fitspng.c.
The utility is coded in standard C but the coding style is old Fortran like without extensive usage of some user defined types and complicated structure of functions. I believe that the style is fine for coding and long time maintained of filter type utilities. I will not lost in function tree.
I'm expecting additional changes in future.
Examples of images
First image is composed exposition of field of NGC 7635 (Bubble nebula in Cas) acquired during summer 2006 by me and Exebece on MonteBoo Observatory (0.6m refl.) and HaP MK Brno (0.4m refl.) by non-enhanced cameras ST-8 and ST-7 in R filter. The image has been created by composition of 1084 images of total exposure time 95540(!) seconds. The images has intensity scaled by asinh and linear profiles. The differences are most remarkable at central part. The central star is saturated on linear scale, while faint details are visible.
 Bubble nebula NGC 7635. Linear intensity profile.
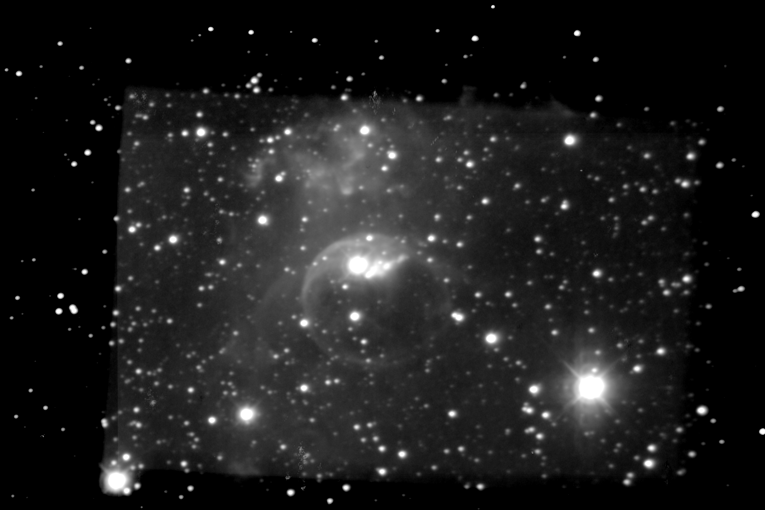 Bubble nebula NGC 7635. Asinh intensity profile.
 Dumbell nebula M27. Linear intensity profile.
 Dumbell nebula M27. Asinh intensity profile.
So, I strongly recommends use of asinh intensity profiles.
Post scriptum. Scaling to preserve all colors
 Dumbell nebula M27. Asinh intensity profile.
 Scaled by intensity. Note better preserving of colors.
The paper Lupton et al.(2004) recommends as an optimal way to scale of output image by intensity rather than every single color. You can use the -f switch to invoke it. The key difference with respect to single color scaling is coloring of the saturated objects. The intensity scale algorithm preserves color ratio in (output) saturated regions. The saturated stars have approximate colors opposite with the white color of previous algorithm. Of course, really (on CCD chip) saturated stars are white again. Unfortunately, the saturated stars can create a strange color defect. To remove it, use another black magic.
Post scriptum. I forget attach a graph of all profiles. Please look on the linear (red) and the logarithmic (blue) and asinh (light green) profiles which ideally "interpolates" beween its.
SVG version.

Download of FITSPNG.
